Back in 2011 hubby and I moved into this adorable house. Of course many MANY others had lived there with their own styles, and the house is pretty old, so we had our work cut out for us as far as updates.
And by us I mostly mean my husband ( he was bound to catch that if I didn't)
One day at Lowes we came across Rustoleum Countertop Transformation. Seeing as we had that nasty wood laminate we gave it a serious look. I LOVE doing any research that ends in savings and what I found out is that it was any ole latex paint and a polyurethane top coat. So we took to our nearest Michael's ( or most any craft store ) and picked up a few different colors.
I picked out a handful of black, 1 white, a few different grays (ended up only using the silver gray), and a silver glitter.
Tested a few different patterns using a sponge and used the first picture of a marble counter I loved as my inspiration. By the way, the sponges are normally pretty large so you should only need to buy one and you can tear it apart. Plus that helps so you can get different patterns from the nooks and crannies of the sponge.
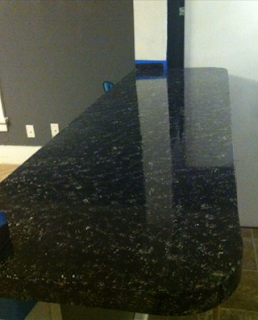
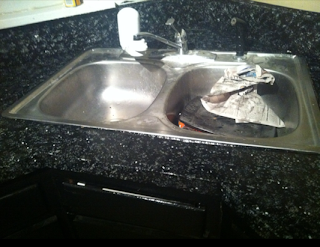
The last 2 pictures are what I ended up with when I was just messing around and I like what I created so much more. These are without the glossy finish.
It's all trial and error to see what you like. A layering effect is what worked best for me since I'm not a huge fan of the marble vein look. I started with black and completely covered my area with a roller. Next I squirted out a small amount of the silver glitter paint and rolled this on making sure too much glitter wasn't in any one area. This is just to catch your eye like the flexs in the marble do. ( remember, if you mess up you can always start over, this is just paint)
Then I added a few speckles of white with the tip of my sponge. I worked from one edge of a section to the next and if one area looked better than another I went back with whichever color was needed.
You don't want every little dot to look the same so I used different sides of my sponge as I needed to encourage the marbling look.
Next was silver, since this is the 2nd primary color I was going for I used a bigger section of my sponge to give me larger 'spots'.
If anything ever smudged or created a large blob of color I was either able to clean it up or go over it with another color and it would blend right back into the whole look.
After finishing each of these steps section by section I kept going over and filling in any black space until it was all covered making sure it was pretty even in pattern too.
Lastly my hubby painted on a few coats of polyurethane, letting it dry for at least 8 hours in between, and then it was all ready for use !
I couldn't be happier with how it turned out. Our kitchen is still a work in progress but this helps it look so much better. All our family ooo and ahh over the transformation, and if you look closely my hubby built a 6 inch back splash all along both walls. We attached that to the wall first so that the painting pattern was cohesive when it was applied.
Tips * Corners are tricky. I tore off smaller sections of my sponge to work into the corners.
Since an ounce of color at Michaels usually only cost a dollar and they always have sales I think we spent less than $30 total for our new counter tops versus the $247 + tax it would have been at Lowes. Plus I was able to completely custom my colors.
~Rayah
~Rayah


No comments :
Post a Comment
Thanks so much for your comment!!
I look forward to reading it!