Friday, April 26, 2013

Happy Day ~ Super Simple Morning Coffee

Oh my... I am in such good spirits today. Have to say, I think it's because of the coffee. I haven't been drinking much lately because I've put myself on a teeth remeneralizing diet ( I'll touch on that topic eventually ).
But after receiving a Starbucks gift card for my birthday last week I broke down and stopped by this morning. I ordered a Grande White Chocolate Hazelnut Latte ( add some caramel and it taste just like a snickers bar! )
It sure has put me in the best mood today. Forgot how much coffee has an impact on your attitude until you've gone without it for awhile.

Here's a simple recipe I love for making flavored coffee at home

1 Cup of Mocha International Delight
1/2 cup 2% milk
1 tablespoon carmel coffee syrup
optional* 1 cup of ice if blending for frapachino

Now for those of you that like to grind your own coffee each morning I prefer this recipe

1 serving of your choice coffee
3 tablespoons of International Delight as my creamer
1 tablespoon of peppermint syrup

What's your favorite morning coffee?

~Rayah


Tuesday, April 16, 2013

Kiss Nail Dress Review

I was flipping through my Cosmo magazine the other day when I came across a little insert for Kiss Nail Dress. There was a coupon along with 4 little samples. I love all sorts of nail art but haven't shelled out the $8+ to try a fad I'm not sure I even like yet so this was perfect. My nails just so happened to be clean so I was excited I could try them out right away.
 It came with a perfect explanation for how to apply them.
  • Remove from plastic strip
  • Line up on nail
  • Press firmly over nail making sure to release all air bubbles
  • Trim length and width if needed
And Viola! All done!
But now to see how long it lasts...
Being as it seems to just be a heavy duty sticker I wasn't expecting it to last through showers, washing my hands, or all the laborious things we put our hands through but after 2 days I decided it was sticking around so I needed to paint my nails!
I picked up this lovely color the other day from Walmart for under $2!
It seemed fitting for spring.
This second picture is after about 5 days. You can see my nail has grown out and the Nail Dress has come off just a bit. Since my nails are getting a bit long for me I decided on day 8 to trim them down a bit and perk up my nails with a L.A. Color Crazy Fiji Purple and a different sample Nail Dress. Removing the Nail Dress was simple, it was however stuck on there much better than I expected. It left a bit of glue behind when I removed it but it comes off easy. This time I applied a top coat to my Nail Dress to see if it'll last any longer.

Let's just color me impressed. I don't think I'd apply a whole set of these on at once but I love mixing them with other polishes. I guess these are worth it after all. Well done Cosmo ad... you've gained a new happy customer.

~Rayah

DIY Faux Marble Countertop

Back in 2011 hubby and I moved into this adorable house. Of course many MANY others had lived there with their own styles, and the house is pretty old, so we had our work cut out for us as far as updates.
And by us I mostly mean my husband ( he was bound to catch that if I didn't)
The pictures I have aren't the best since this was an older project.
One day at Lowes we came across Rustoleum Countertop Transformation. Seeing as we had that nasty wood laminate we gave it a serious look. I LOVE doing any research that ends in savings and what I found out is that it was any ole latex paint and a polyurethane top coat. So we took to our nearest Michael's ( or most any craft store ) and picked up a few different colors.
I picked out a handful of black, 1 white, a few different grays (ended up only using the silver gray), and a silver glitter.
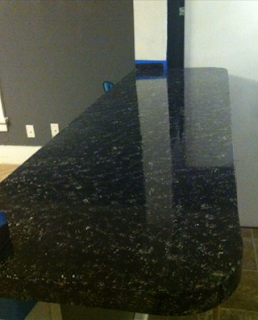
Tested a few different patterns using a sponge and used the first picture of a marble counter I loved as my inspiration. By the way, the sponges are normally pretty large so you should only need to buy one and you can tear it apart. Plus that helps so you can get different patterns from the nooks and crannies of the sponge.
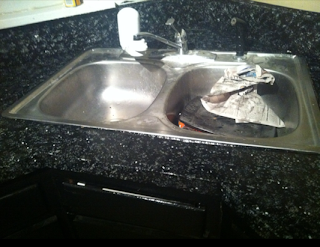
The last 2 pictures are what I ended up with when I was just messing around and I like what I created so much more. These are without the glossy finish.

 It's all trial and error to see what you like. A layering effect is what worked best for me since I'm not a huge fan of the marble vein look. I started with black and completely covered my area with a roller. Next I squirted out a small amount of the silver glitter paint and rolled this on making sure too much glitter wasn't in any one area. This is just to catch your eye like the flexs in the marble do. ( remember, if you mess up you can always start over, this is just paint)
Then I added a few speckles of white with the tip of my sponge. I worked from one edge of a section to the next and if one area looked better than another I went back with whichever color was needed.
You don't want every little dot to look the same so I used different sides of my sponge as I needed to encourage the marbling look.
Next was silver, since this is the 2nd primary color I was going for I used a bigger section of my sponge to give me larger 'spots'.
If anything ever smudged or created a large blob of color I was either able to clean it up or go over it with another color and it would blend right back into the whole look.
After finishing each of these steps section by section I kept going over and filling in any black space until it was all covered making sure it was pretty even in pattern too.
Lastly my hubby painted on a few coats of polyurethane, letting it dry for at least 8 hours in between, and then it was all ready for use !


I couldn't be happier with how it turned out. Our kitchen is still a work in progress but this helps it look so much better. All our family ooo and ahh over the transformation, and if you look closely my hubby built a 6 inch back splash all along both walls. We attached that to the wall first so that the painting pattern was cohesive when it was applied.
Tips * Corners are tricky. I tore off smaller sections of my sponge to work into the corners.

Since an ounce of color at Michaels usually only cost a dollar and they always have sales I think we spent less than $30 total for our new counter tops versus the $247 + tax it would have been at Lowes. Plus I was able to completely custom my colors.

~Rayah

Friday, April 12, 2013

About me

Hey there!

My name is Shurayah. I'm 25 years old and from Arizona. The hubby and I currently live in Oklahoma, I've lived here more than half my life so I guess you could call me an 'Okie.

I started dating my husband in the summer of 2008. We both knew right away that we wanted to get married and spend forever together. He proposed in a helicopter over looking a HUGE spelled out sign all lit up with lights that said "MARRY ME".


We married less than 7 months later. 09/09/09 made it easy for him to remember ;)
I am learning every day what it is to be a wife. I struggle and I fail but I thank hubby for being patient and learning with me. I am grateful he's on this journey with me.

We also have a pup named Paisley. No babies yet so she's our cuddle bug. She has an endless amount of energy and absolutely adores my husband. Hubby brought her home as my Valentine's gift in 2012.

Paisley hates it when mommy leaves

I am overjoyed to add that I am a daughter of the Most High God. My identity is in Him and Him alone. I have struggles in life and I'm learning everyday to go to God as my source. He has blessed me with an amazing husband that I could only dream of and a future so much brighter than I know.

This blog is just a fun little collection of my life. I'm no writer but I hope you enjoy!


Please feel free to contact me by email at shurayah@aol.com

Thursday, April 11, 2013

Strawberry Cake

So the other day my husband was antsy so I decided to bake him a cake.
Why? I don't know but it seemed to be exactly what he needed.
I looked through the pantry and found a mix for Moist Supreme Strawberry Cake. He absoltely loves strawberries.

The recipe calls for
  • 1 cup of water
  • 1/2 of oil
  • 3 egg
  • mix
It didn't specify what kind of oil and right now I'm trying to sneak Coconut Oil into everything so that's what I used.

I set my oven for 350 degrees and mixed everything into a bowl. Coated my 7 x 11 glass pan with Coconut Oil, poured the mix in then baked for 36 minutes. ( time will vary based on your oven )

Now for my secret weapon... Frosting! I heated the frosting up in microwave just long enough for it to be a pourable consistency ( 30 seconds to 1 minute). Now that you've safely pulled the cake out of the oven go ahead and pour the melted frosting over the cake. The cake has air pockets that will absorb 90% of the frosting down into the cake. The cake still stays moist and even more delicious. The frosting is not over powering this way.

Now if you'd like your cake a little prettier I suggest following all the steps above then letting it cool and coating it with a thin layer of frosting so you wont see any air pockets. But my husband was too anxious to wait any longer.

Results- the most delicious box Strawberry cake I've ever had.
Enjoy!

~Rayah